There is no need to fear Blender 3D - Setting and Configuration File
After reading this article, you should be able to select the best version of Blender software for yourself and clearly know how to keep custom settings and restore them.
The best way to learn a software tool is to do it yourself. However, when using a new software tool for the first time, most of the time, we will encounter difficulties with the settings and these settings if configured incorrectly may slow down our learning progress. Software tool settings may look easy at the first glance but due to different degrees of complication, some of the settings may require hands-on experience. You may want to start off by customizing your software settings as it will greatly help you familiarize yourself with different software functions. To learn a new tool effectively, you will have to try it yourself but before you try, make sure you know how to revert the settings.
Beginner with no fear - 1. Knowing the version and Managing the versions
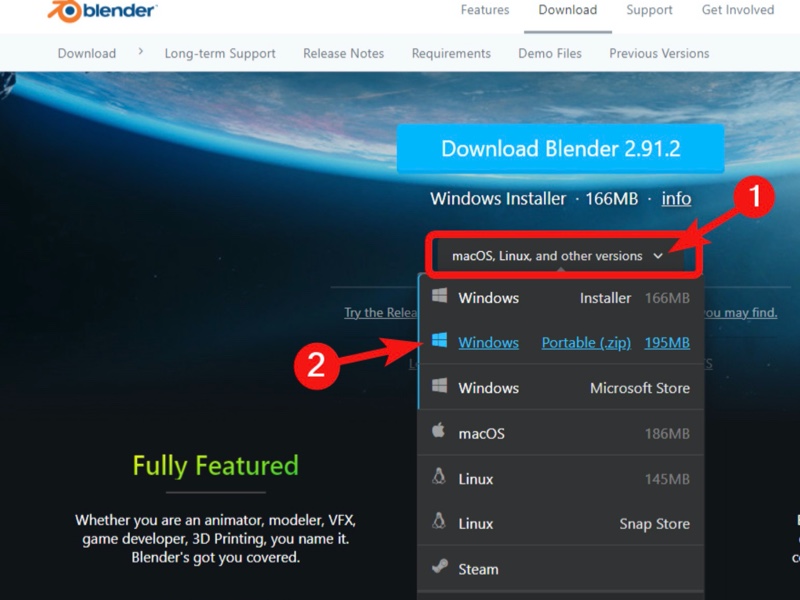
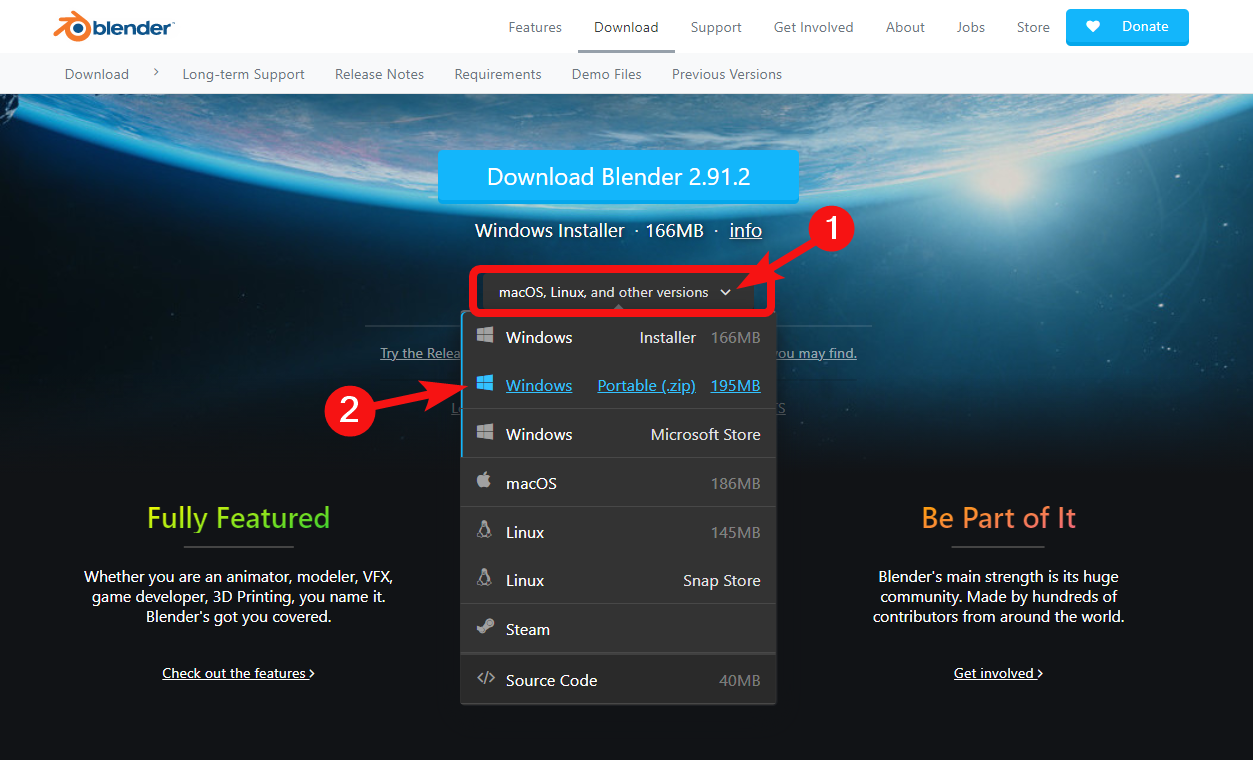
Visit Blender’s official website then open the software download page on which you will be able to download the windows installer file. Installing it is easy, simply run the installer file then follow the instructions of the setup wizard. After installation, you should be able to find the Blender program icon on the desktop. Double click the icon to open the program. As shown in Figure 1.1, the second item of the list of download files is the portable app, which is just a zipped file. After downloading it to your PC, simply unzip the file and open the .exe file to start using the app. You can also create a desktop shortcut for the portable app. We will discuss the app later in this article.

Next, let’s discuss different versions of the software. Because Blender is open source so each day there are many developers developing multiple features at different places. This is the reason why Blender is powerful. But because the update is so frequent that there are many versions being updated each day so this could look really confusing to the user. There are three types of software in general and they are outlined as follows:
1. Full Version (Fig 2.3)
Full version is actually Blender's most complete version of software, and also the most recommended version of all. The full version number is shown on the download button. Unlike any other commercial software, Blender does not update once a year, it updates as soon as the new version passes the quality test so this makes sure the user will always get the latest version. Notice of update will normally be posted on the official website.
2. Beta Version (Fig 2.4)
Beta version is updated daily and has the latest updated functions but the tradeoff is its stability. We do not recommend using it for your project as it is more appropriate for trial designs. If you would like to try the latest updated functions, the beta version will be the choice. Actually, I myself do not know much about Blender’s software but as an adventurous person, I always use the beta version for commercial projects. As of now, I haven’t experienced any unexpected issues.
3. The Blender LTS (Long-Term Support) Program (Fig. 2.5)
The LTS program is updated once every two years. The last digital of the LTS version number is always 3. As shown in the figure below, the current LTS version is 2.83 so the next version will be 2.93. Each version released on the official website should overlap with the previous version for at least a year. The LTS program once released seldom requires addition of new functions except minor issue corrections and enhancements. Therefore the LTS program is primarily targeted at professional or corporate level teams. However, it can also be adopted by private users if stability is preferred over availability of new functions.

After learning the purposes of these three types of software, you will then know which type to choose for your application. As for installation, a lot of users prefer installing the software on their PC but this is in no way related to stability of the software. The portable app is sometimes more recommended than the ones requiring installation. The Blender launcher discussed in the next paragraph will show you how you can easily upgrade the portable app.
Blender Launcher
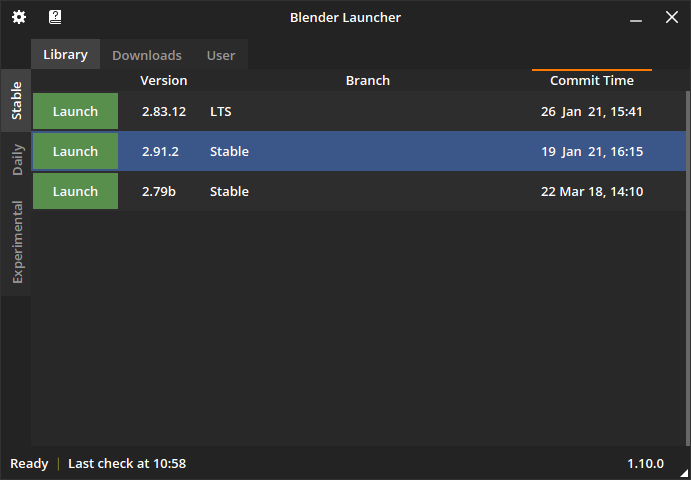
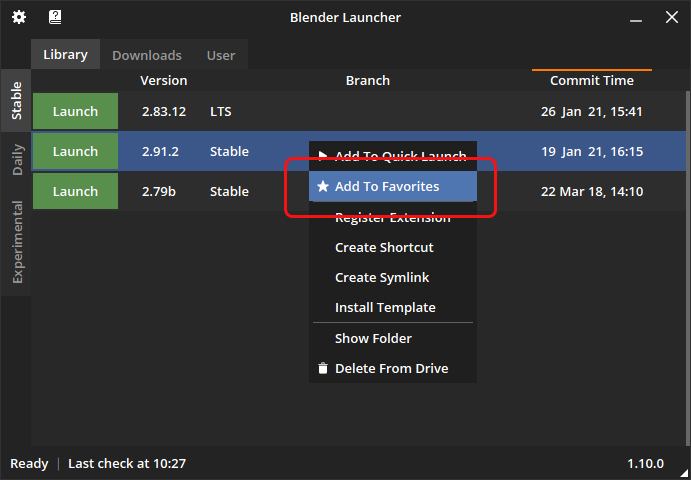
Blender Launcher is basically a small easy-to-use utility program. The program interface is user friendly without too many complex settings. At the top right corner, the three tabs allow you to switch between Library, Downloads and User pages. On the left of the Library and Downloads pages, there are Stable, Daily and Experimental tabs which, when clicked, will show installed versions of software and versions available for download respectively. To open an installed version of software, simply click the Launch button. Right-click the installed version to add to the favorite list which can be opened by clicking the User tab then the Favorites tab. The Blender Launcher allows you to access each download site with a single mouse click.
If this is your first time using Blender Launcher (Hint 1), select a destination folder to which versions of files are downloaded. The utility program will automatically download, unzip and save the selected versions of software to the destination folder. After that, you can simply open these program apps on Blender Launcher. Therefore, with Blender Launcher, you do not have to install many software versions on your PC’s local drive. Should you decide to use the latest version, simply right click your mouse to remove the old versions.
Hint 1: The name of the folder in which the apps are saved must not contain Chinese characters so select folders with English names only.
Beginner with no fear - 2. Understanding Settings
In this section, we will not discuss the settings in detail, instead, we will show you how to select the destination folder and correctly back up the configuration file.
There are two files, startup.blend and userpref.blend, with one used for app initialization and another used for preference configuration. Both files have the same blender filename extension. In other words, starting the app opens these two files which are saved in two different config folders.
1. Under the Operating System (also known as the system configuration file)
ex :(C:\Users\USER\AppData\Roaming\Blender Foundation\Blender\2.92)
In order to locate the system configuration file, you will need to enable hidden files, folders and drives in “File Explorer Options” as shown in the diagram below. Then for example, if your PC’s username is USER, the configuration file of version 2.92 will be saved in C:\Users\USER\AppData\Roaming\Blender Foundation\Blender\2.92.


2. Built into Software (also known as internal configuration file)
ex :(C:\Program Files\Blender Foundation\blender-2.92.0rc-windows64\2.92)
ex :(D:\BlenderSoftWare\blender-2.92.0rc-windows64\2.92)
The configuration file can also be installed along with the software. It is saved in the installation directory. An example of the directory path is C:\Program Files\Blender Foundation\blender-2.92.0rc-windows64\2.92. For portable app, an example of the directory path to which the configuration file is saved is D:\BlenderSoftWare\blender-2.92.0rc-windows64\2.92.
Some people may doubt the need to save the configuration file in two different locations. Most people usually save the Blender software on the USB thumb drive so if the configuration file is only saved in the system folder, it would be very inconvenient to load every time the app is started. If the configuration file is saved in the same directory as the program app, you will find that the Blender software becomes plug and play.
However, wouldn’t it be confusing to the Blender program app if the same configuration file can be found in two different folders? There is a priority mechanism for selection of configuration files. When the Blender software is started, it will search the app folder first for the config folder and if not found it will then search the PC system. See the diagram below for more details about the Blender configuration file load flow. Generally, you can easily start the Blender software if there is not much change in the settings. Blender by default will create a configuration file in the system. If we are using the portable app, we just simply need to create a config folder in the app folder for the configuration file. In this way, the configuration file can then be imported to the app for enhancing the program portability.

The above folder settings for the configuration files may look confusing but as soon as you’ve gained thorough understanding, it would be easier for you to learn file recovery and backup later on. Resetting to factory settings is to clear all settings. It is simply erasing all contents in the config folder. As for configuration file backup, the two files, startup.blend and userpref.blend, should be kept to restore system settings. If the config folder is set up properly, you can easily back up and restore system settings. In this way, you can use the Blender software without having to worry about messing up the app settings.
Blender Cloud Backup Settings
The Blender cloud foundation supplies each member with an account which allows them to back up settings of different versions of software. The user can simply install the service plugin provided by the Blender cloud and sign in your account to start backing up your settings on the cloud. This is definitely an extra service beneficial to all. Sign up today to enjoy this fantastic backup service.